
CWB color simulated process screen printing and color accuracy requires the correct color separations, the correct ink and colors, and the most effective half-toning method to correctly simulate color. The CWB color simulated process screen printing method is best executed with interlocking halftone screens. With the CWB interlocking halftone screen printing process printers can realize unique benefits compared to other industry practices for simulated process printing and halftone printing practices.
1. Greater color reproduction accuracy on press
2. Better more accurate ink coverage
3. The ability to print with fewer colors as color simulation is more accurate. Resulting in lower printing costs and faster printing times.
4. Interlocking halftones produce a better hand or feel on garments.
These benefits give CWB Ink Seps screen printers a distinct advantage over other screen printers using methods that are not founded in the color science of a real color model. Nor having a correct understanding of halftones and the options available in halftone screen printing.
In this article we will take an in depth look at halftone screen printing methods and options and compare them. Then we will look at how to set up your halftones for interlocking halftone screen printing.
Interlocking VS Other Halftone Screen Printing Methods
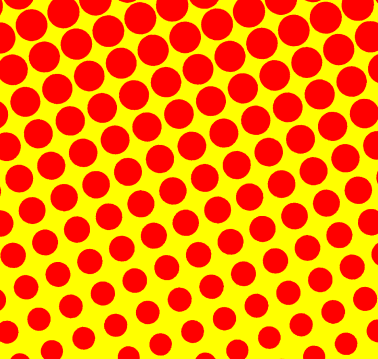
Interlocking halftone printing is printing interlocked or inverted halftone dots side by side.
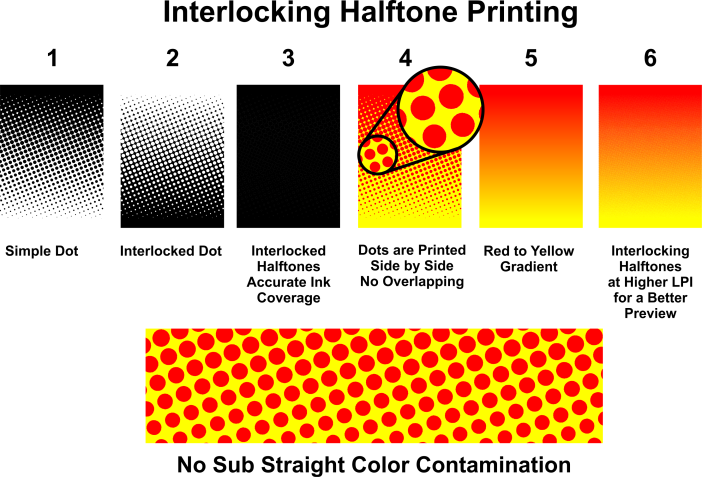
The above chart shows how interlocking halftones work and why interlocking is the best practice for halftone screen printing. The benefits of interlocking are numerous such as, better color reproduction accuracy, more accurate gradient printing, better ink coverage, reduced colors printing due better more accurate color simulation and more.
Figures 1 and 2 show the two colors in the red to yellow gradient. Figure 1 is normal dots and figure 2 is interlocked dots. When working with interlocking you only need to interlock 1 of the 2 or 3 colors in any color or color gradient. If you have red and yellow in a color gradient you can interlock either of the colors but only one of the two colors needs to be interlocked .
Figure 3 shows ink coverage an important aspect of the printing process. In this figure both figures 1 and 2 are combined. The regular halftone dots placed on top on the interlocking halftone dots. Notice the image is pure black which indicates perfect ink coverage based on the halftones interlocking. Also, the interlocking eliminates any color contamination from the t-shirt or sub straight color.
Figure 4 shows how the interlocking halftones work as being printed side by side as opposed to printing dots on top of dots or overlapping like flamenco or rosette halftone printing.
Figure 5 show the original red to yellow color gradient.
Figure 6 shows the gradient reproduced as interlocking halftones at a higher LPI. Clearly demonstrating how accurate interlocking halftones are for halftone color simulation and reproduction in the printing process.
Interlocking halftone printing based on CWB color and separations also result in a better hand or feel on garments as you print dots side by side and not on top of other dots. Which results in less ink build up on the garment. Also being able to print with less colors results in less ink on the garment compared to printing with more colors.
Interlocking halftone printing based on the CWB color model also allows you to more accurately simulate color while printing with less colors. This results in less ink costs for print runs and saving money and reducing printing time.
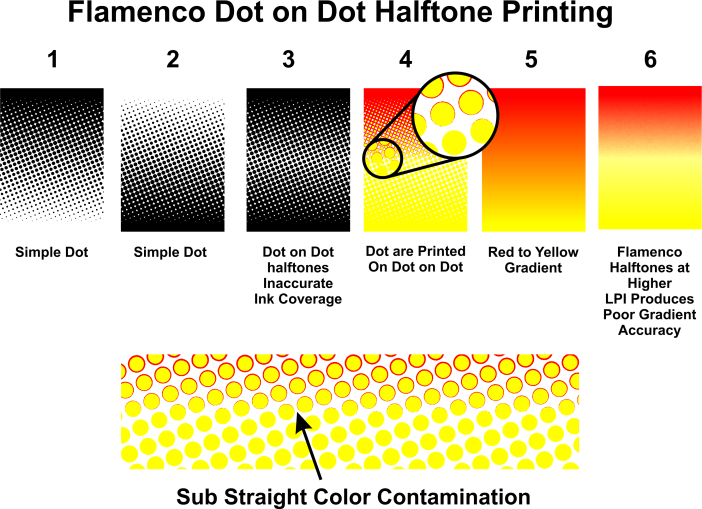
Flamenco is printing halftones at the same LPI and angle or dot on dot. The above chart shows how flamenco halftones work and why flamenco is not the best practice for simulated process color halftone screen printing.
Figures 1 and 2 show the two colors in the red to yellow gradient. Figure 1 is normal dots and figure 2 is normal dots. These halftone dots are set to the same angle and LPI. The dots printed on top of each result in what is referred to as stepping on color.
Figure 3 shows flamenco ink coverage an important aspect of the printing process. With figure 1 and 2 over laid on top each other we can see the ink coverage is reduced and inaccurate.
Figure 4 shows how the flamenco halftones work as being printed dot on dot. Dot on dot results in color being printer over by other color(s) significantly reducing color simulation accuracy. Flamenco printing also results in color contamination from the t-shirt or sub straight color being printed on.
Figure 5 shows the original red to yellow color gradient.
Figure 6 shows the gradient reproduced as flamenco halftones at a higher LPI notice the inaccuracy or the red to yellow gradient. Which is the result of the yellow dots being printed on or stepping on the red dots.
Screen printing with the flamenco method results in inaccurate color simulation, color contamination from the sub straight and inaccurate ink coverage.
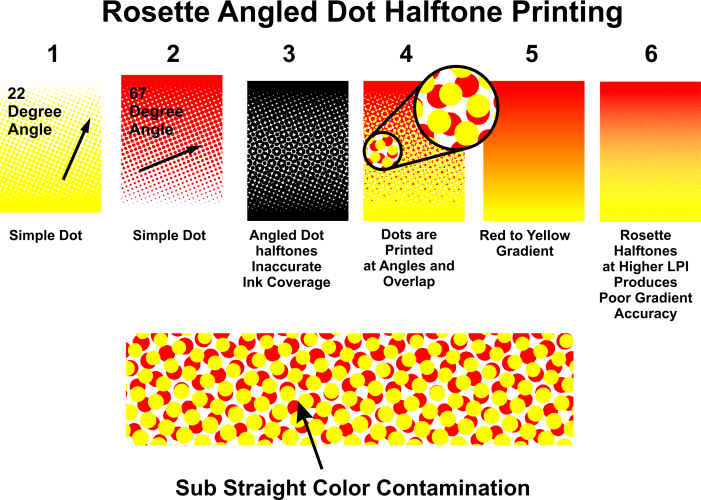
Rosette halftone printing is the process of printing halftone dots at rotated screen angles. Side by side but still over lapping. Rosette is more accurate than flamenco but also has some accuracy issues due to dots overlapping and sub straight color contamination.
Figures 1 and 2 show the two colors in the red to yellow gradient. Figure 1 is normal dots at a 22° angle figure2 is normal dots at a 67° angle.
Figure 3 shows ink coverage as black. Ink coverage is an important aspect of the printing process. In this figure both figures of the halftone dots from figure 1 and 2 are placed on top of each other. Notice the image is not pure black like the interlocking halftone tones. Resulting in incorrect ink coverage and open area which can result in color contamination from the t-shirt or sub straight color coming through the area that is not covered by ink.
Figure 4 shows how the rosette halftones would be printed side by side with some overlapping. Which does result in minor color stepping on color.
Figure 5 shows the original red to yellow color gradient.
Figure 6 shows the gradient reproduced as rosette halftones at a higher LPI to show more accurately the color gradient that results from rosette halftones.
Notice rosette is better than the flamenco results but not as accurate as the interlocking results.
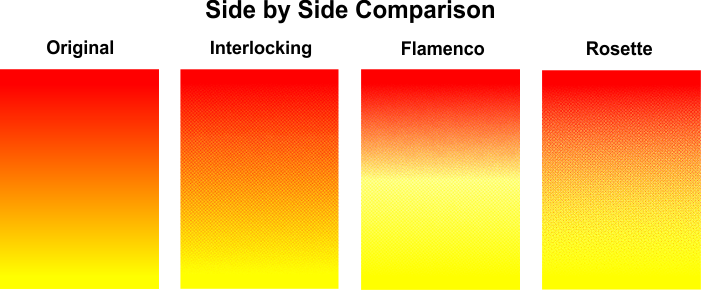
Looking at the side by side comparison of the 3 halftone screen printing methods covered in this article we can clearly see the differences in color reproduction and simulation.
Interlocking halftones produce a more accurate simulation of the orange in the red to yellow gradient. Providing a wider spectrum of color simulation. Without and color stepping or color or any color contamination from the t-shirt or sub straight color.
Halftone Simulation of the Visible Spectrum of Color
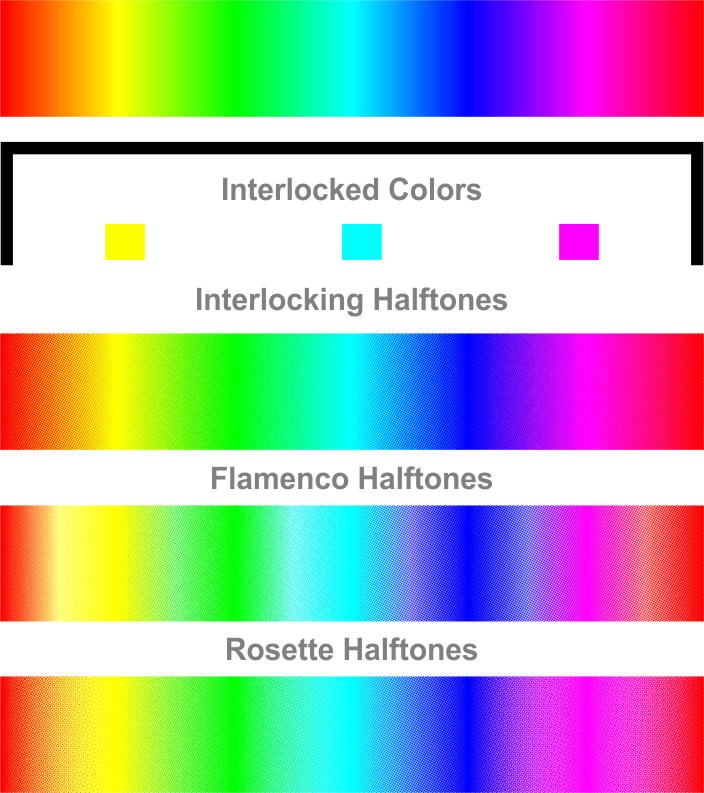
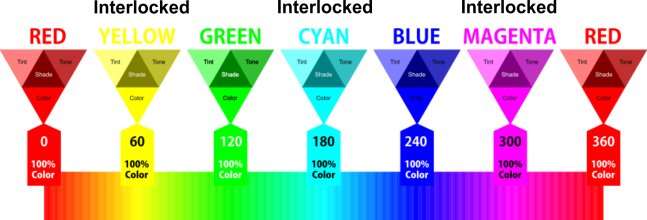
The image above compares the application of interlocking, flamenco and rosette half toning applied to the visible spectrum of color. Notice the color shifting and contamination in both the flamenco and rosette images. This inaccuracy is not present in the interlocking halftone version.
The visible spectrum of color from light is the foundation of all color. If the simulation of the foundation of color is not correct then all other color simulation will be incorrect.
When interlocking is used the interlocking dots are applied to the various colors that are blending to simulate all the colors in the color spectrum accurately.
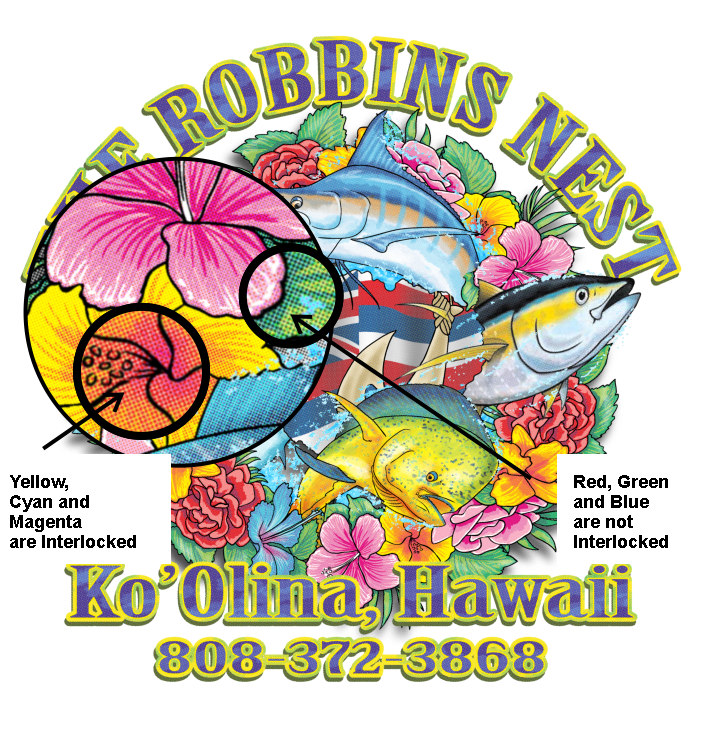
In the interlocking halftone image above the colors, yellow, cyan and magenta are interlocked so they can blend accurately into the colors red, green and blue.
The key to understanding how to apply interlocking is to analyze which colors are blending and apply the interlocking halftones to one of the colors. For example. If an image or graphic had red, yellow and green. Then you would interlock the yellow as it is the color that blends into red and green based on the visible spectrum of color and the CWB color components you are using to simulate the colors in your design or art.
This same process would apply to any image separated with InkSpes CWB color separations.
Separation Examples and How to Use Interlocking Halftones
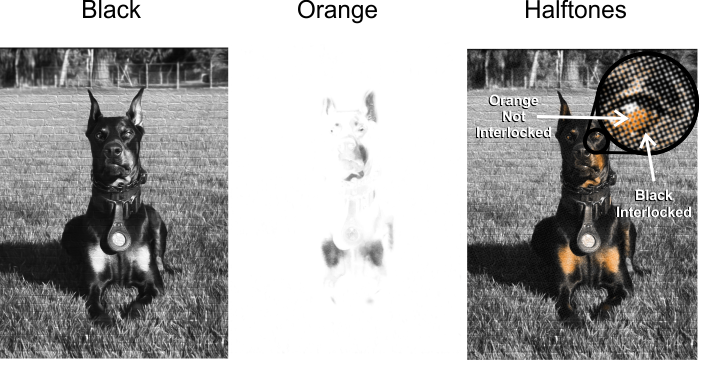
Above is a simple two color simulated process color separation of a dog. In this halftone example we would only interlock the black. White base, white highlight and orange would be regular dots. With only the black interlocked so the black and orange will not overlap or be printed dot on dot. Resulting in the orange printing clearly and vibrantly with accurate ink coverage.
Notice that with just two colors, accurate color separations and correct halftones quality photographic simulated process printing can still achieved.
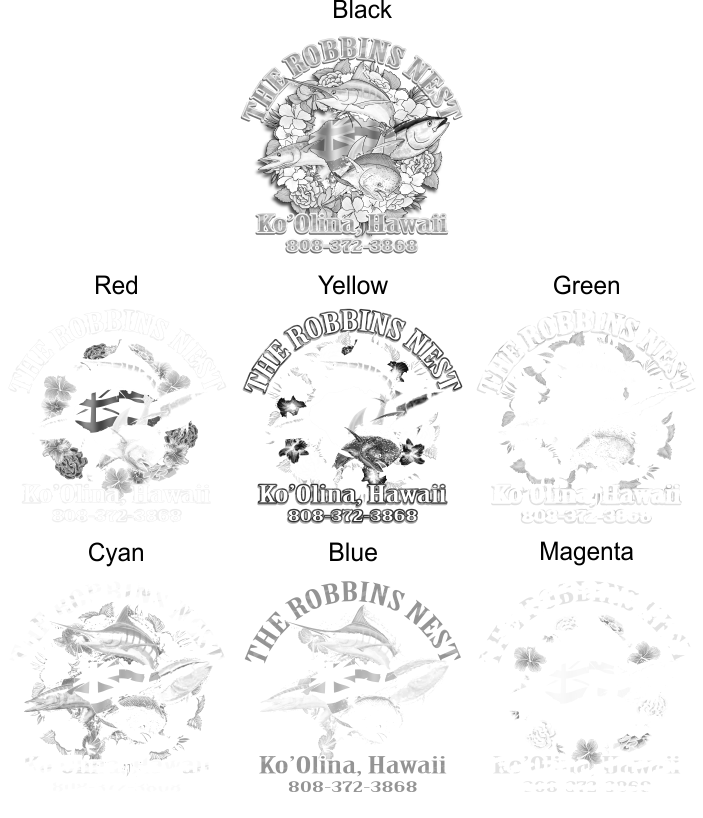
The separation above has all of the colors in the color spectrum. with red, yellow, green, cyan, blue and magenta plus black. In this case interlocking would applied to every other color component in the CWB color model 6 colors mode.
For example yellow, cyan and magenta would be interlocked the red, green and blue would not be interlocked.
What about the black? For the black we use a normal halftone dot and use a rosette style halftone method with an angle of 67°s. This will effectively reduce the amount of black stepping on colors.
Above are the separations rendered into halftones. You can see in the image and color reproduction quality with the interlocking halftone method and black introduced as a rosette form of half-toning with the 67° angle. To introduce the black into the color without reducing how the black may step on the colors.
Breaking it down -
Red - Normal dot 22° angle
Yellow - Interlocked dot 22° angle
Green - Normal dot 22° angle
Cyan - Interlocked dot 22° angle
Blue - Normal dot 22° angle
Magenta - Interlocked dot 22° angle
Black - Normal dot 67° angle
Interlocking can be applied to all sorts of half tone printing effectively the objective to achieve better color accuracy, ink coverage, as well as the other benefits listed in the beginning of the this article.